
Phone Photography Badge, Steps 1 & 2

I love the freedom and flexibility of being able to take photos anytime, any place with my phone camera. That said, I never felt like my phone took pictures as well as my larger, fancier camera. I have seen gorgeous pictures taken on iPhones on the internet, so I was excited to learn phone photography tips for how to take advantage of the best camera… that is… the one that I always have with me.
I was curious to learn more about photography in general as well… what are the “rules” photographers use to take good pictures? And what is it about our eyes and our brains that find some pictures more pleasing than others? I know a good photo when I see one… but how can I take them myself more consistently? Earning the Phone Photography Badge taught me all this and more.
You can see the Phone Photography Badge Guide, or “recipe” for the badge here. Each Badge Guide contains three steps to be completed in order to earn the badge. These steps can be done on your own, but we encourage you to grab a few friends and learn together!
Step 1: Research
Step 1 is always focused on research. Look up the topic online, watch videos to learn a skill, or visit your local library. You can read about the resources and photography tips we found below. For this badge we looked into the history of photography and phone cameras and did research to learn phone photography tips and tricks.
But first, a little bit of background: I love photographs! I have 100’s of albums (all labeled and dated) filled with them. I even had custom shelves built to accommodate the albums. Some of my fondest memories of my grandma consist of time spent looking through photo books and hearing stories of relatives from long ago. I have really struggled with the move away from printed photos to keeping them (hopefully) somewhere in “the cloud”. Working on the research part of this badge made me curious about this passion. Why are photographs so meaningful? What is the history of photography? How can I take better photos?
History of Photography
Photography can be traced back to the 11th Century. An Iraqi scientist invented the Camera Obscura. It did not record images but projected them onto another surface. Although the images were upside down they could be traced to create drawings that were accurate.
The Spruce Crafts
I found this timeline on Spruce Crafts. It does a nice job hitting the major advances in the history of photography.
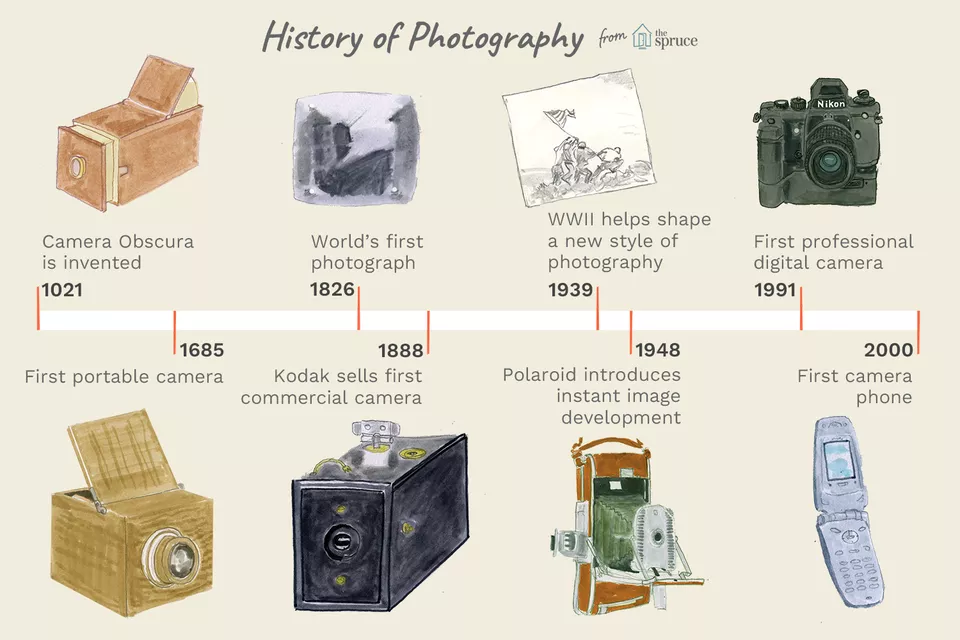
1830’s-Photography as we know it today can be attributed to Joseph Nicephore Niepce from France. He was able to expose a pewter plate and produce the first recorded image that did not fade.
1800’s (late)-Other plates were used to produce images (daguerreotypes, emulsion and wet). Photography was only for professionals and the very rich.
1880’s-George Eastman started the Kodak company. He invented a flexible roll film, inside a self-contained box camera. This was the first camera that was affordable enough for the masses to purchase. Photography exploded!
1930’s-Small 35mm cameras began to capture “life as it happened” in place of staged photos. Graphic images of war were taken during WWII and were a stark contrast to the staged images from WWI.
1940’s-Polaroid introduces a secret chemical process to develop film in less than a minute inside the camera.
1950’s-Technology from Japan introduces easier image control to photography with SLR style cameras that had interchangeable lenses and other accessories. For the next 30 years these remain the camera of choice.
1965-Polaroid prices drop and instant pictures become affordable for all.
1991-The first digital camera is introduced by Kodak.
2000-First camera phone is introduced.
History of Phone Photography
Digital Trends and Android Authority detail the somewhat contested history of phone photography.
2000-Both Sharp and Samsung claim to have released the first cell phone with a built-in camera. Sharp’s version allowed people to send photos electronically.
2002-Sanyo introduces the first camera phone in the US.
2003-Camera phones “take off” with 80 million sold worldwide. Camera phones beat out DVD players sales this year.
2006-Camera phones surpass sales of digital and film cameras. Camera photography continues to improve.
I found a PBS Documentary on American photography and the power of photographs. It was very moving. This doc discusses how photographs can influence history (sometimes inaccurately). For example, photographs have inaccurately shaped how some people visualize and remember Native Americans in history. The documentary explores how photographs allowed for a more powerful social reform (as in the child labor movement) due to the emotional quality of the photos taken. The documentary also looks at how photography has impacted science, medicine, advertising, celebrities, and our involvement in wars. It is definitely worth checking out!
Another video exploring the history of photography:
Phone Photography Tips
Now that we have explored the history of photography from pewter plates to camera phones let’s look at what makes a good photo and how to take them on our phones!
Hubspot offered some very useful tips for beginning photographers. Here are a few easy ones that I could apply right away.

- Turn on your camera’s gridlines. These lines follow the “rule of thirds” which is a principle that says an image should be broken down into thirds, both horizontally and vertically. This allows you to balance your photo by placing points of interest in the intersections or along lines. We learned about gridlines in our Apple phone photography class as well (see Step 2 below!).
2. Focus on the Subject. Take some extra time to set up your shot. Tap your screen of your smartphone to focus the camera on your subject.
3. Embrace Negative Space. To make your subject stand out more embrace negative space. Your subject should not always fill your frame (try leaving ⅔ of the photo empty).

4. Find a different perspective. Take photos from an unusual or unexpected angle. Most photos are taken straight on. A different perspective will create a more interesting photo.

Here are some quick Youtube videos for even more camera phone tips and tricks.
This one discusses magic hour, editing software, the rule of thirds, selfies, and lenses for your phone. I had no idea you could purchase lenses for your cell phone!
This one is a little more in depth covering little known tricks for taking incredible photos. I am excited to try out the silhouette photos which is something I’ve always wanted to do.
We’ve also been collecting photography tips and tricks on Pinterest. Click here to check out our Phone Photography Badge Board.
Editing on Google Photos
The editing options in the free web-based program, Google Photos, are pretty impressive and user friendly. When you click to start editing the photo it looks like there are only three options – light, color, and pop – but if you click the drop down arrow next to any of these, many additional options are revealed. For example, under light you can adjust the highlights and the shadows which can brighten up your photos without washing everything out.
In 2008 Polaroid stopped making the famous Instant film-but took their chemical secrets with them. Although many companies have attempted to produce instant film, none have done it as successfully as Polaroid.
The Spruce Crafts
Apps we like for Editing Photos
Both of these apps are fairly user friendly, though I’d say A Color Story is more fun to play around with that Lightroom, especially for a newbie. They are free to download and include some editing options for free.
Fun Facts from Backlight:
- The first aerial photography was taken by French inventor Turnache in 1858. He shot Paris from a hot air balloon.
- Retouching photos and making them “color”, was achieved by coloring in watercolor for the first time in 1840.
- At present, only 2 of 10 images taken with digital cameras are printed on paper.
- The term “megapixel” was first used in 1984.
There are a TON of online resources for phone photography tips. However, we found that an in person class taught us more in 45 minutes than hours of watching videos online!
Step 2: Learn from Others
To complete Step 2 of the Phone Photography Badge, we signed up for a free photography class from our local Apple Store. You can search for similar classes near you here.
First, Jessica, our Apple store employee and teacher, taught us how to add and use grid lines to our screen when using the photo app/camera. You do this by clicking on “Settings” (the gray gear icon) then “Camera” then switch “Grid” to on.
The grid lines help people use the rule of thirds or the rule of three discussed above. I use them now whenever I take a photo and whenever I edit one.
The grid lines are a lifesaver when trying to line up a photo with the horizon or anywhere there is a dramatic straight line (like a tree or a building). Jessica also mentioned that when taking photos of people we should aim to line up their eyes with the top grid line or at an intersection on the grid.

We learned that our cameras will automatically focus on something closer in frame and blur out the background. You can also tell your camera where to focus by clicking on the object on the screen. So for the photo above, I clicked on the speaker on my screen. From there, you can adjust the brightness of the photo, right on the screen by dragging your finger up and down. This is a simple trick but I had no idea! If you hold down your finger on the object on the screen, it will lock the focus of the camera on that distance.
Next, we learned how to take a great flat lay. If you don’t know, a flat lay is a photograph taken from above, usually of objects on a table. These are commonly seen on Instagram. When taking a photo from directly above, your phone automatically populates two crosses. When they are perfectly aligned, your phone is parallel to the table.
Making sure you phone is actually parallel makes a big difference in these types of photos because a perfectly flat phone won’t distort shapes (see how the cribbage board in the top photo below looks more like a trapezoid and the cribbage board in the bottom photo is closer to a perfect rectangle?).

We learned how to successfully take panoramas. I have been taking panos for years, but Jessica pointed out some things I had not thought about before. First, you have to move to take a pano but you want to be as steady as possible. So use two hands and keep your arms in close to your body with your elbows at your side. Also, stand facing the center of the photo and turn just your torso to the left to start taking the pano. Then move slowly and steadily clockwise until your torso is facing the left (or wherever you want the picture to end).

Katie and I have older iPhones, so we do not have portrait mode (yet!) but we played around with some iPhones that did. Jessica showed us how to take a photo like the ones below, with the blurred background around our heads and then how to change the background to black using the “Stage Light” setting.
When taking a photo like a close up portrait you want to pay attention to what is in the background. Notice how the blurred out room behind me doesn’t have any distracting colors. You also want to have your subject face natural light without being directly IN natural light. When the light is coming from behind you, it can give a racoon-eye look. When it comes from either side, wrinkles and other shadows are more evident. You can see the soft glow in the photos below because we are facing the front of the store which has floor to ceiling windows.


It is pretty incredible what these cameras can do! I think they look like actor headshots!
A couple more quick tips from Jessica:
- Use a timer for selfies so you can adjust your pose, hair, etc. and you won’t shake the camera by attempting to push a button while capturing your shot.
- If you use the “live” setting for your photos the camera actually takes a 3 second video. You can then go in and choose which shot you like best out of many frames.
- If you hold your finger down on the button when taking a picture, it captures a bunch of photos – this is called a burst. Bursts are helpful if you are capturing something that is moving (like a person jumping into a lake). You can then choose the best frame or multiple frames!
- If you want to add depth to your photo, take it with direct light coming from a 90 degree angle. This is useful in food photography. You don’t want the food back lit or front lit. Lit from the side provides more depth.
We have already learned a lot from this badge! We can’t wait to put our new skills to use by completing Step 3: Take Action and Teach Others. Check back to find out how we completed Step 3.
We’d love to hear from you! What are your favorite phone photography tips? Have you tried any of the ones we mentioned above? How did your photos turn out? If you try one of these, post the photo online and tag #badgesforall so we can see it! Or send us a message here.
